Sunday, October 14, 2007
Second Day in Chaingmai
It was a beautiful day here. We did so much that it is difficult to put in to words alone. We visited many temples, an umbrella factory, and silk factory. The Thai people work so hard and are so happy. Hope that you enjoy the photos from today!
Saturday, October 13, 2007
Our Trip to Thailand Begins!


Well, we launched our vacation from San Francisco International Airport. Our flight left at 1am so we were able to sleep most of the way. We landed in Taipei at 5:35 local time and hung out for four hours. We roamed around the airport and saw some cool stuff, including a Hello Kitty terminal, gorgeous orchids, and some other cool stuff. (OK my English is a bit poor right now because I am wiped out!!) We arrived in Chaing Mai around 12pm local time and had a short bus ride to the hotel. It is so beautiful here. It is green and lush in a way that I have never seen before. The air is moist and the roads filled with motorbikes and taxis. It is so amazing to be able to experience another culture. This is sure to be the trip of a life time.
Tommorrow we go to see some of the Temples here in Chaing Mai. Now we are off to the night market. YEAH!!!!
Wednesday, July 11, 2007
Thursday, March 1, 2007
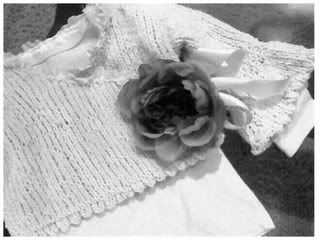
Rose Toes Vintage Kimono Sweater (toddler size)

Tuesday, February 27, 2007
Lemon Lime Sock Yarn


Ok, so the sock bug has me in it's grip! I decided to dye my own yarn so that I could get exactly what I want. This is one of the skeins that I dyed with a lemon lime colorway. It is self striping and is now knitting up nicely. I will post pics of the final product when I am finished. The base yarn is a cotton fleece (80% cotton 20%wool) by Lambs Pride. It is dyed with procion mx. These will be perfect for the summertime!
Monday, February 26, 2007
Sweater Pin How To

Sweater Pin How To
Materials:
Natural Colored Polymer Clay
Heavy Gauge Metal Wire
Adirondac Alcohol Inks (colors of your choice)
Adirondac Alcohol Blending Solution
Paper towels
Extra fine sandpaper
Satin Varnish (non yellowing)
For both pieces:
Form metal wire into desired shape and sandwich between two sheets of polymer clay that has been rolled out into about 1/8"thickness. *One will be round with a hole in the center and the other is just a stick!
Using an x-acto knife, cut edges into desired abstract shape. Press and mold until the pieces look organic.
Bake according to manufacturers instructions.
When it has cooled completely, sand until smooth and wipe clean with a damp cloth.

Coloring:
This is the tricky, but fun part! Using three different colors of alcohol inks, decorate the items. I start with the lightest color and layer until I like the way it looks. I use paper towels to rub color in, blot, and apply color. The blending medium gives you the look of small diffused circles. Use sparingly as it causes the ink to disperse in the area it is applied. If you want some defined lines, apply ink to an area, allow it to set and dry slightly and then burnish it off.
LAYER LAYER LAYER! The more you layer, the prettier it is.
Once you get the look you like, let it dry for a few hours and coat with 2 layers of satin varnish.


Tuesday, February 13, 2007
Delainee's Pink Hat
 My niece was visiting this weekend and I couldn't resist making her something to take home. I hooked this hat for her, without a pattern, in about 2 hours. It is made of baby chenille and is so soft and sweet. She loves it and insisted on wearing it to bed. She asked me if I was making her socks, so there is another thing to add to my to do list. They are not nearly as quick as this little hat, but I will get them done.
Because I didn't use a pattern and no longer have the hat, I don't really have a pattern to post, but I can tell you that it is just a simple combination of hdc and fpdc. I had 5 fpdc going around the hat and increased between them until it was the right diameter and then did a few rows without increases and actually decreased a few stitches in the front where the brim would go so that it would fit her head nicely. I then tripled my yarn for the brim and placed it so that it would be centered across her forehead. She was here so I just tried it on her until I figured it out. It only took three rows of hdc, using two chains and decreasing by two on the edge to make it look right.
As you can surely tell, I am not a hooker, but a knitter, so this description is a bit out of wack. If you have questions, just email me and I will see if I can clarify.
Sunday, February 11, 2007
AND THE WINNER IS!
I must admit, I had no idea that so many wonderful submissions would be made. Your stories made me laugh and cry. It is so cool that such a simple thing as knitting has made a mark on so many lives. After much agonizing, I finally threw my top names into a hat and picked a winner. And the winner is............

Paddlespinner

Paddlespinner
Please email me your shipping information and I will get these out to you this week. Thanks again to everyone who participated. I will try to do a contest of some sort every few months, so check back often. I think that the next one will be something fun and goofy!
Saturday, February 10, 2007
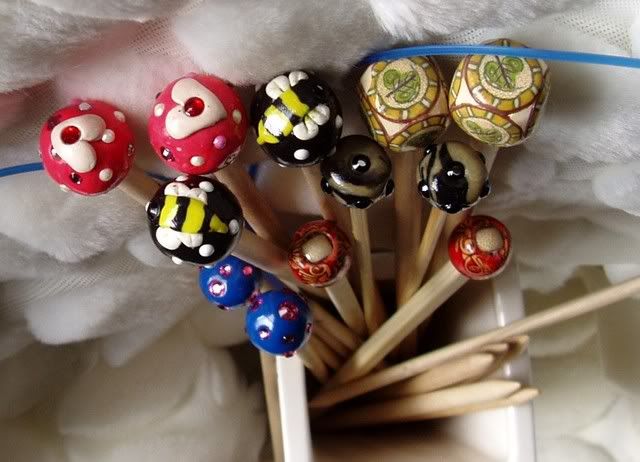
I am at it again! Handmade knitting needles
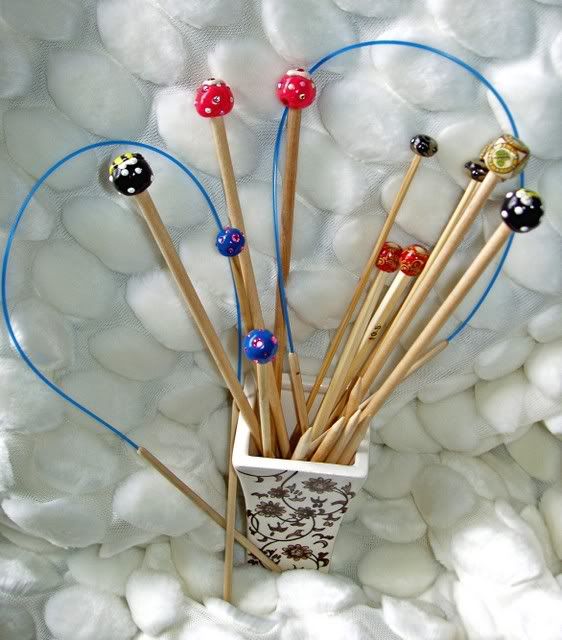
I really need to stop adding projects to my list of to do's! I think I am driving my DH batty. Here are some of the handmade knitting needles that I am making. Most are made with dowels, some bamboo skewers and one set of chopsticks. I use beads, polimer clay (I varnish these so that they are shiny!), swarovski crystals and anything that I find for the ends. My favs are the circular needles! I am so proud of myself! The how to's for the circs are after the pics. Have fun and send me pictures of the ones that you make!
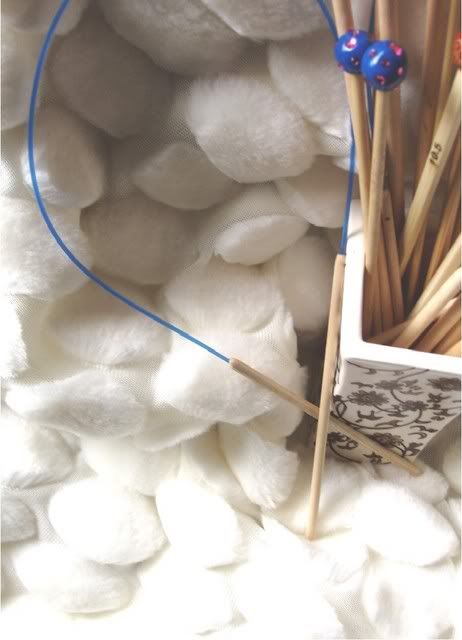
Circular needle how to:
These are simple, but be patient. First choose your dowel size and cut them to the legnth you desire. The sharpen only one end of each dowel. On the flat side, use a 1/16 drill bit and and drill a hole right in the center about 1/4" into the dowel. I then begin sanding down the dowel. It takes a few minutes of sanding, but getting it nice and smooth is vital. Be sure to round out and taper the end with the hole! Once it is smooth (finish with an extra fine grit), rub it with mineral oil and then rub in parafin wax and buff. The rest is a piece of cake. Cut a legnth of weedwacker line and apply a dab of E6000 to the end, insert into the hole firmly. Repeat for the other end of the line. Allow these to dry for a few hours before you use them!
If you are going to make tiny circs, just use a smaller drill bit and a plastic coated wire using the same instructions as above. The little ones require a very steady hand and I recommend using bamboo skewers instead of dowels.
What TOTALLY ROCKS about this project is that the weedwacker line comes in so many colors that you can use a different color to denote the needle size! Secondly, they only cost about 20 cents per pair! More money for the yarn stash!
FYI You can use metal stamps from Harbor Freight to impress the needle with the size if you like. (these are so cheap and I use them on all sorts of things!)
Tuesday, February 6, 2007
I LOVE IT!!!

This is a sweater pin that I made last night. It was so simple and it looks amazing. The picture doesn't do it justice! It looks like a polished stone, but without all the weight! I think that I might post the directions for this one if enough people are interested. Let me know what you think!
Monday, February 5, 2007
Oopsy Daisy

My neighbor is ready to have a baby any day now and as it goes, she was ready two weeks ago! I have been putting off making anything for her because I hadn't decided what I would want to do. It is her first baby, a girl, and she is a cool, hip young mommy. After seeing her yesturday, her belly close to hitting the ground, I figured that I needed to get on it and give up on some extravagant design. I started flipping through my mags and found this pattern in the new Knit It. As I always do, I did change it up a bit. The original showed a daisy with six petals, but because I never use even numbers, I cut it down to five and resized the petals. I made them a bit larger and longer and stitched them on so that they appear slightly raised. SOOOO CUTE!!! These are the projects that made me wish I had another baby, but only for a very very brief moment! OTN now are matching booties. These are my own concoction so we will see how it goes. Who knows, if she makes it another week, maybe I can make a sweater too!
Friday, February 2, 2007
Shabby Chic Felted Clutch

Well, here is a peek at the felted clutch that I have been working on. I am going to add some petite felted flowers nested in the chiffon and a wrist strap. I am please with my progress, but it is not yet finished. I am surprised with it's size. It is a nice roomy bag, not too big, not too small. I was thinking about adding some swarovski crystals to the chiffon too, but haven't decided. The toughest part of this bag was felting it just enough so it was thick and fuzzy, but also allowing my stitches to show. It is shabby chic you know! Any coments or suggestions would be greatly appreciated!
Eye Candy
I have been on a beading frenzie this week. I had the flu, so I spent two days in bed with my knitting and my bead box. The flu sucked, but finishing some projects made me feel a little bit better. As you might ascertain, I have the busy hands syndrome. I can't just sit in bed and watch the boob tube. Here are a few of the things that I made. 
First is a sterling, crystal, and glass row counting bracelet. It is actually functional and cute. This one is a little BLING BLING, so I am going to make another out of pearls for a more demure look. You know it is bad when accesorize with knitting gadgets!


These are just some fun row counters! They are great for insetting sleeves or denoting decreases. They are light, easy to slip on and off, and a little sparkle never hurts! They make me feel like knitting a sweater...

First is a sterling, crystal, and glass row counting bracelet. It is actually functional and cute. This one is a little BLING BLING, so I am going to make another out of pearls for a more demure look. You know it is bad when accesorize with knitting gadgets!
Next are more stitch markers. I made these to match my knitting bag! I love turquoise and black. These are slightly different than the others that I made. They are made using memory wire for the loop instead of splitrings. The benefit is that they can be placed and removed at anytime.


Here is a peak at the oilcloth knitting bag that I made a few weeks ago. Two great things about this bag.
1) It is oilcloth! DUH! I live at the beach and bring my knitting along while I watch the kiddos play in the surf. It doesn't get dirty and if it does, a handywipe is all I need!
1) It is oilcloth! DUH! I live at the beach and bring my knitting along while I watch the kiddos play in the surf. It doesn't get dirty and if it does, a handywipe is all I need!
2) Because sand and yarn don't mix, I put skein pockets on the outside that have grommet holes that lead to the inside. I never have to take my yarn out! I just pull my project out of the center of the bag, knit away and place it back when I am finished, or need to go chasing after a runaway skimboard. FYI this also prevents the yarn from getting tangled and keeps my colors separated nicely if I am doing fairisle. Well, I could go on and on, but that might be seen as boasting and I am not a boaster (right?- well, maybe a little!)
Last project I promise!
These are just some fun row counters! They are great for insetting sleeves or denoting decreases. They are light, easy to slip on and off, and a little sparkle never hurts! They make me feel like knitting a sweater...
Finished Fetching

I have finished the "fetching" gloves from Knitty! They were quick and so cute!! My 8 year old diva wants a pair in lavender so they must be cool too! These are a must try for a knitter who wants a fast, but fulfilling project.
Sunday, January 28, 2007
The Ellusive Bag Clasp
I found it! This is the bag clasp that was shown on the Brown Lunch Bag in Knitty http://www.knitty.com/ISSUEwinter06/PATTbrownbag.html


Happy knitting!

My deals of the weekend

I had the coolest idea! I saw these cute purses on sale for $3.24 and thought hmm, I can cut this to pieces and use the clasp, chain handle, zipper, and scrap vinyl for my knitting projects! 

I can't believe I didn't think of this sooner! Maybe I did, but I have too many thoughts to remember. Anyways, here are some of the goodies that I found!

Big ball purse frame with scrap vinyl (maybe I could use the vinyl for my felted clog soles!) The purse frame was easy to pry off using my handy flathead screwdriver. I guess you could call it recycling de shelly!

Stitch and Bitch Calendar at Borders $4.00! YES!
Saturday, January 27, 2007
DelaineeRose TwinkleToes
 DelaineeRose is getting ready for her first dance recital. I am such a proud auntie!
Yet Another Pair of Felted Slippers!


I have finished yet another pair of felted slippers. This pair is one of those Oops I have run out of yarn, wow those are cute!, stories. I ran out of the tan Lambs Pride and ended up just doing the toes and edging out of black cherry Lambs Pride. With the needle felted accents, these are to die for! If only I had made them for me!!! Yes, it is better to give than recieve, right?
Thursday, January 25, 2007
The Purse Is Complete


Mady's Fluffy Sweater

My daughter had to have a fluffy sweater this year, so here is what I came up with. Big yarn, big needles, and lots of fluff. I tend to stay away from novelty yarns, but this one feels like you are wearing a blanket!


Because you asked so nicely!

I have had several requests for this pattern, so here it is! This pattern is the property of RoseToes Designs (me). This is for personal use only. Feel free to add a link from your page. I will be posting free patterns occasionally so check back!
The felted slippers were my holiday project this year. I pumped out countless pairs for all of my family members! I use two methods. The adult slippers had heal turns and gussetting, but these are beginner friendly. The slippers in the picture are my daughters (they are only ones that I still have in my possession!). They are easy as pie and quick! These are the style I made for all of the kids, but it can be adjusted to make adult slippers.
Asian Inpired Felted Slippers
pattern is for a child's size 1-2
*NOTE These can easily be adjusted for width by adding to CO, but be careful not to add too much! I did make a pair for my husband at 36 CO and he wears a size 14-15 shoe . If you do adjust the cast on, remember to adjust the band too
mc: (held single throughout)
Lambs Pride Bulky
Black onyx85%wool / 15%mohair
cc: (held two strands throughout)
Patons Classic Merino Wool
Leaf Green
100% wool
CO 30Rows 1: k to end
Row 2: p to end
Row 3: ssk, ss to last 2, k2tog
Row 4: p to endRows
5 & 6: rep
3&4Rows 7-16:
k to end
Row 17 & 19: m1, k to last st, m1, k1
Row 18 & 20: p to end
Continue in SS until the piece measures 2 in longer that the foot measurement then begin decrease rows
Decrease:Row 1: {k2, k2tog} to end
Row 2 & 4: p to end
Row 3: {k1, k2tog} to end
Row 5: k2tog to end
pull yarn through stitches and secure.I put a few stitches in the end to make sure that the hole is closed completly and then weave in my tail. Since these are felted, the stitches won't show and it makes a nice smooth rounded end.I then do a partial construction before I add the band.
Stitch up the back. Stitch up the top of the foot until you have an opening that is 1/2 the legnth - 1/2 in.
Band- using 4 dpns, pick up 30 stitches along top edge starting at the toe seam. m2 (basically, you are adding two extra stitches at the center of the seam)
rows 1&2: k
row 3: k 31, k2tog
k until band measures 1 1/4"- 1 1/2"bind off.
Seam beginning at toe side of the band until there is a 5" opening
Felt until "the slipper fits." Stuff with plastic grocery bags to get the desired shape and allow to dry completely (2-3 days).
Add needle felted accents with roving.
If you need felting instructions, let me know.
Have fun!
Wishing you warm tootsies,
Shelly
Tuesday, January 23, 2007
Wouldn't you love to have these glass stitch markers?


In celebration of my new blog, I am going to give one lucky knitter a gorgeous set of handmade stitch markers. They are made with sterling, glass, and crystals.
All you need to do is tell me why knitting has made a mark on your life! I will be accepting comments until February 11th and then I will post the winner. Have fun with it, be serious, or plead if you must. Please only one comment per person. You may comment to any of my posts to enter, just note contest in your subject line. Thanks for looking! I can't wait to see what everyone writes!
To Frog or Not to Frog, that is the question...
 To frog...
Ok, the gauntlets have been frogged and are now on the way to being some gorgeous socks. I decided that my hands wouldn't be warm enough, so I am going to try the gauntlets in worsted weight wool instead. I change my mind constantly, so this should come as no surprise!

My niece and nephew are coming to visit me this weekend and I am so excited! I hate to brag, but they are the cutest little guys ever! Here is a picture I took of my neice last month. This was after a long day of shopping and playing at the beach! She is still gorgeous, it is so not fair!!
As promised, here are some of my recently finished projects!


Felted Cloche with satin/chiffon peony, Felted purse with camelia accent, Felted do-dad bag, and Asian inspired felted slippers. As you can tell, I have been on a felting kick. Primarily because I wanted to practice my needle felting accents. I think that I have it down now. Time to move on!


This is probably enough for now! Can't wait for the next post!
Friday, January 19, 2007
On the needles

It has been so cold, here in Cali, this winter! My hands are freezing in the morning when I take the kiddos to school, so I decided I needed mittens of some sort. So, I just started this cute little pair of gauntlets. I am making it up as I go along, so who knows what might happen. The yarn is a gorgeous self stripping 100%wool sock yarn, but the needles are so tiny! This one may take awhile. I am anxious to add the crochet work to the wrist area! I might do that before I finish the hand of the gauntlet.

I am also about half way through a basic shawl for my best friend's birthday. We were shopping in Carmel and saw this at a boutique. She loved it and it was so simple, I figured it would be a quick gift to make. It is simply a stocking knit stitch extra wide scarf with cable ribs on the ends, one button hole and some gorgeous buttons. The ones that we saw at the boutique were 100% cotton (and $100 YIKES!), but I decided to turn it up a notch and use a silk/rayon. The sheen is stunning! Her birthday is in two weeks, so I will post a finished picture soon!

I just got this out of the wash! My sister had started this bag a few years ago, but between having a toddler, a baby, and doing all that she does, it got forgotten. When I was at her house this weekend, I decided to finish it for her. She had done the pink and was planning on putting a ruffle around the top, but ran out of yarn. I improvised and came up with this. It is the same stitch pattern as the hat I just finished, so I didn't have to memorize a different chart. I am going to add some hand painted wooden handles, give it a little shave, and it will be ready to go!
Subscribe to:
Posts (Atom)


